Showing posts with label Adsen. Show all posts
| 0 comments ]

In normal cases all blogger users can put the adsense block at the top of the post or at the bottom Only.
but the problem here is that alot of bloggers don’t get high CTR ( clicks ) by this placement,
so they should play with the ads placement,
the best solution here is to put you google ads blocks in the middle of the post in your blogspot blog.

and you have to check out Google AdSense heat map

blogger don’t offer this option by default settings, so you have to be tricky to do it,
here is easy and fast way to do it.

Procedure :--

  • go to your blogger account,

  • and navigate to Layout >> edit html,

  • and check check Expand Widget Templates

  • Find the tag : "<data :post.body/>"

Code:-
<div expr:id='"aim1" + data:post.id'></div>

<div style="clear:both; margin:10px 0">

  <!-- Your AdSense code here -->

</div>

<div expr:id='"aim2" + data:post.id'>

  <data :post.body/>

</div>

<script type="text/javascript">

var obj0=document.getElementById("aim1<data :post.id/>");

var obj1=document.getElementById("aim2<data :post.id/>");

var s=obj1.innerHTML;

var r=s.search(/\x3C!-- adsense --\x3E/igm);

if(r>0) {obj0.innerHTML=s.substr(0,r);obj1.innerHTML=s.substr(r+16);}

</script>
Note that you must replace
<!-- Your AdSense code -->

with block code provided by Google.

Now you are done, just to put your google adsense block in the middle of the post, you have to put this code in the exact place you want to put AdSense block.

Enjoy earning with your blog too.. do comment for any type blog topic or any help!!!

Thanks,
-Amaresh

| 0 comments ]

In this article I am going to show you the different SEO links to check your blog or website's analysis.Check below for different analysis:

  1. Meta Tag Analyzer: This is used to analyze your meta tags.
  2. Keyword Rank Checker: This is used to check yours keywords rank.
  3. Keyword Analyzer: This is used to analyze your keywords.
  4. Link Popularity:This is used to check the link popularity of your blog/site.
  5. Search Engine Saturation:This is used to check your search engine popularity.
  6. Keyword Suggestion:This is used to suggest keywords for your blog/site.
  7. Keyword Density:Check your keyword density with this tool.
  8. Page Rank:Check pagerank of your pages in google.

Good Luck!!!

Thanks,
-Amaresh

Feel Free to Contact Me for any help!!!

| 0 comments ]

Google Analytics Blogger LogoWouldn’t it be nice to know how many people actually visited your blog each day? How about knowing which of your posts are the most popular? Well surprisingly Blogger doesn’t currently offer any native blog analytics but fortunately there is Google Analytics — available for free.

Google Analytics is a great tool that will show you all sorts of useful information about how people found your blog, keywords they searched on to find you, where they came from and even how long they stayed. You’ll learn more about where your visitors come from and how they interact with your blog. This is a must tool if you are trying to build a profitable blog otherwise you are flying blind!

This article will show you how to add Google Analytics to your Blogger blog. It’s a fairly simple process and doesn’t require any technical skill at all.

Step #1 - Setup a Google Analytics Account

Go to Google Analytics and sign in using your Blogger login. If your account doesn’t work for some reason, you can create a new one instead. Once you login you’ll see a screen that looks like this:

google analytics


Google Analytics Blogger Sign Up Step 1

Click on the “Sign Up >>” button and proceed to the next step which will ask you for your general information. Website URL, Account Name, Country, and Time Zone.

If you noticed, I just put my Blogger url (without the http://) and called it “David’s Account” because this is your top-level container for 1 or 100 different websites so it’s a good idea to name it something more general. The next step will ask you for your contact information which includes your first name, last name, phone number, and country. Easy so far right? :-)


Your last step in signing up will ask you to accept the user agreement terms and conditions which you should read (just kidding…who actually ever reads these entire legal terms anyhow?).
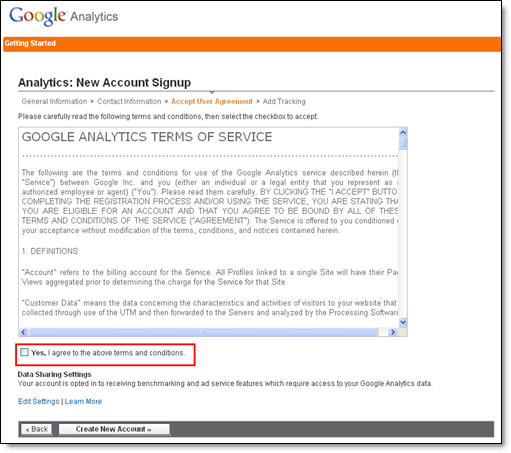
Google Analytics Blogger Step 4

Now this next screen is very important. This is the code you will need to copy and paste into your blogger template. Go ahead and click into the box and it will automatically highlight the entire block of code for you. Now you need to copy that code and paste it into notepad or into a MS Word document. Save it as you’ll need to use it later.
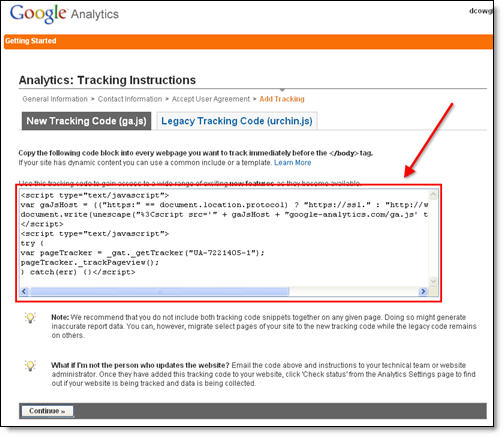
Google Analytics Blogger Step 5

After you click on the “continue >>” button you will be taken to your brand new Google Analytics dashboard! You will see your blogger blog listed but with no analytical data….yet.

Ok, now you are done with setting up your Google Analytics account. The next step is placing the tracking code into your Blogger template so it can report back to Google Analytics and provide you with some cool data points.

Step #2 - Adding GA Tracking Code to Your Blogger Template

This is not a very difficult step even if you are afraid to touch your template code. Login to your Blogger account and then click on the “Layout” => “Edit HTML” tabs. This will bring you to the template code. Before you make any changes, I advice you to back up your template just in case there are any problems. After you’ve done so, continue reading.

Now in the edit template html code window, scroll all the way to the bottom of your template code and look for the tag. There should only be one of these closing tags in your template. If you can’t find it then your template wasn’t properly created and you should add one right above the tag.The tag should always be your last line of code in your template. It signifies the end of your template.

Ok, now go back to the code you saved before in a Word Doc from Google Analytics. You are going to copy it and paste it right above the tag as illustrated in the image below. The yellow highlighted code is the new GA code I just pasted into my template.
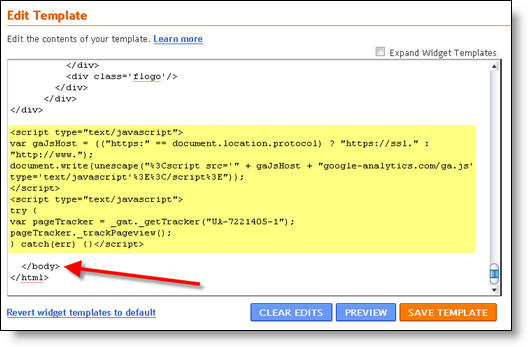
blogger google analytics code 2

Save your template and you shouldn’t get any error messages. If you do, it’s most likely not related to this GA code and something else with your template itself. Assuming you’ve been successful with your save, you are all done embedding the GA code in your template!

Step #3 - Confirm Google Analytics is Tracking

Go back into your Google Analytics account and look at your dashboard. Most likely you will see a little yellow exclamation mark under the “status” column that looks like this: google analytics tracking not installed. This means everything isn’t working properly yet which is fine because we are about to tell GA we just added the code. From your dashboard, click on the “edit” link which is located to the far right.
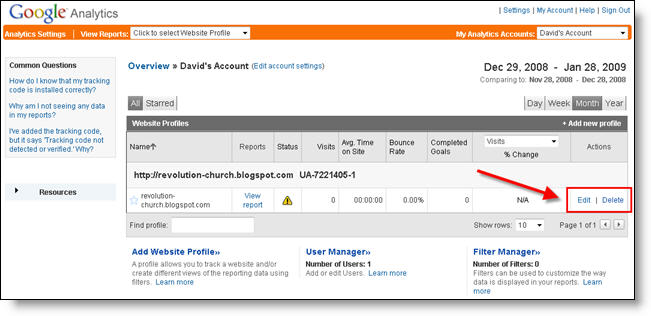
Google Analytics Blogger Dashboard Edit

After you click on that link, you’ll see another screen like below. It will say “Tracking Not Installed” followed by a link “Check Status”. You’ll want to go ahead and click on that link which will tell GA to visit your site and look for the new code you just pasted in your template.
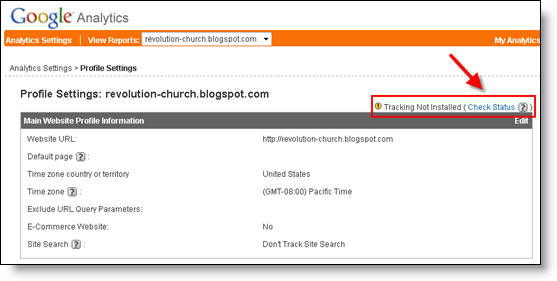
Google Analytics Blogger Dashboard Check Code

Assuming you pasted the code in there as instructed above, GA will find the new code and begin tracking everything on your blog. If you are still having problems, it’s most likely something to do with GA and you should read their help guide to troubleshoot your problem.

Google Analytics Blogger Dashboard Success

The message seen here, “Waiting for Data” means you have correctly setup GA and data is being gathered! Click on the top left Google Analytics logo and it will take you back to your dashboard. From there click on the “View report” link and that’s where all your very important Blogger visitor data will start appearing!
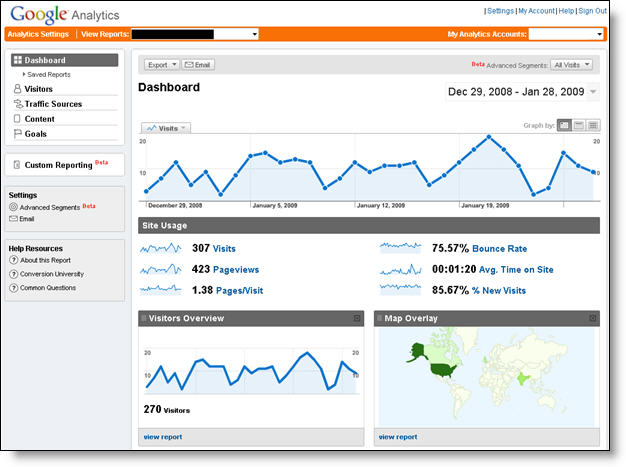
Google Analytics Blogger Dashboard Results

Now it usually takes an hour or so before you will see any data (maybe longer if you don’t get much traffic to your blog) so please be patient. Trust me, you’ll be logging in at least once a day just to see how much traffic your blog is getting. It’s very addicting and powerful information to learn from. You’ll be surprised which posts are your most popular and what countries people are coming from to read your blog.

Google Analytics is very powerful and we have just learned how to install it into your Blogger template. We haven’t even scratched the surface on the features and reporting it can do. For most Bloggers, this will be enough. Data will be collected and you will just review it. Others with more in-depth goals (like selling products or services, creating a sales funnel, etc) will want to spend more time learning GA. Hope you enjoyed the tutorial and don’t blame me for your new found addiction!

Source:- GA

Thanks,

-Amaresh

| 0 comments ]

Friends,

Before some days, Adsense application approval process was bit easy, anyone who owns a blog or account in Adsense Revenue sharing websites can get approved with their adsense account.

But situations have changed now, to ensure high Quality Publishers for Adwords advertisers, Google has made several strict changes in their approval process.

Am going to list some simple tips for getting your adsense application approved.

1) First and foremost thing to be taken care is apply for adsense only after you have sufficient contents in your website. Getting adsense approved in first attempt is bit easier than in re-attempts.

2) Although posting Copied contents is allowed in some cases like Educational Information, Previous Year Question Papers, do not add such posts to your account before getting your adsense account approved.

3) Simply to say your account must contain only self written contents when Google verifies your application.

4) Have a brief Profile and your original photo in your profile if you apply through any Revenue sharing websites.

5) Apply through Gmail ids which has your original name(Payee name in Adsense)in it, do not use other mail ids with your nicknames.

6) If your application is rejected by Google just wait for at least one month and then re apply, by the mean time try to post many self written contents as much as you can. If you re apply at once, your application may be rejected again by adsense Verification team even without reviewing.

7) If you are applying through your own website, website navigation, originality of contents, and broken links are the factors to be considered.

Follow this simple tips to get your account approved easily.

Related topic:-

Resorce!! :-http://www.indiastudychannel.com

| 0 comments ]

Friends,

Before some days, Adsense application approval process was bit easy, anyone who owns a blog or account in Adsense Revenue sharing websites can get approved with their adsense account.

But situations have changed now, to ensure high Quality Publishers for Adwords advertisers, Google has made several strict changes in their approval process.

Am going to list some simple tips for getting your adsense application approved.

1) First and foremost thing to be taken care is apply for adsense only after you have sufficient contents in your website. Getting adsense approved in first attempt is bit easier than in re-attempts.

2) Although posting Copied contents is allowed in some cases like Educational Information, Previous Year Question Papers, do not add such posts to your account before getting your adsense account approved.

3) Simply to say your account must contain only self written contents when Google verifies your application.

4) Have a brief Profile and your original photo in your profile if you apply through any Revenue sharing websites.

5) Apply through Gmail ids which has your original name(Payee name in Adsense)in it, do not use other mail ids with your nicknames.

6) If your application is rejected by Google just wait for at least one month and then re apply, by the mean time try to post many self written contents as much as you can. If you re apply at once, your application may be rejected again by adsense Verification team even without reviewing.

7) If you are applying through your own website, website navigation, originality of contents, and broken links are the factors to be considered.

Follow this simple tips to get your account approved easily.

Resorce:!!!!:-
http://www.IndiaStudyChannel.com

Thanks,
-Amaresh

| 0 comments ]

Let me explain this with an example.

When someone in New York city want to get their home painted, they will go to Google and search for "Painters in Google". Google will display several hundred results. The person will click on first few results in Google Search and choose one of them. The painting companies who are listed in top few results will get the business.

So, for 1000s of such companies, getting listed in top 10 results of Google search results is key to the success of their business.

Now, Google decides which company to list in the top of the search results ?

Google considers several factors including the following:

1. Content of the website - if the website's content includes the words 'Painters', 'New York' etc, then Google will understand that this site is about "Painters in New York" (but there will be 100s of such sites with similar content)

2. This is most important - Google will check how many of those sites have a link to their site from other sites using the keyword "Painters in New York". Google will assume that the site with most number of links is the most important site and will list that site in the top of the search results.

Now, when such companies pay us, our members will write blogs and articles with appropriate links to their website. This will increase the number of links to their site with the desired keywords and so help them to get listed in the top of the search results. This will in turn lead to more business for them

Good luck for New Blogs!!

Thanks,
-amaresh

| 0 comments ]

Dear all,

uzz up!Alexa Ranking,Every One want to be in the top of Alexa Ranking and why not. It is the Best Way to know your website ranking .Alexa Ranking is not a new concept in this Internet Market. It is 13+ more Years Experience in the Market of Internet ,to deliver the Best to its users and Now it is on

You want to see your site ranking through alexa ? then follow the following steps:
  1. Choose Firefox else download me
  2. Choose me
  3. then install and restart your Firefox.
More about alexa:-
Alexa Sparky 1.3.0

by rommel, geoffmack, bewest

Get Alexa data in your statusbar!

Add to Firefox

More Images

Long Description

Sparky is a free Firefox browser plugin built by Alexa, that accompanies you as you surf, providing useful information about the sites you visit without interrupting your Web browsing.

* Learn about Website Traffic Trend information -- Is this site getting more popular, or less popular?

* Get detailed traffic information including Reach and Rank -- How does this site's traffic compare to other sites on the Web?

* Surf more efficiently with Related Links for each page -- If I like this site, are there others that I might want to visit?

Plus, as you surf around the Web with Sparky you are helping to make the Web a better place for everybody by contributing to the traffic information that Alexa provides.


Relater stuffs:-

If still you are facing any problem with this them give comments and i ll try to solve it out.

Thanks,
-Amaresh